Are you discouraged from starting a blog because you think it will be way too difficult to set one up and haven’t a clue what terms like cpanel, mysql database, ftp mean? Don’t worry, you don’t have to be a “techie” and, with my step by step tutorial, can easily start a blog in a matter of minutes.
 I tell you when I first started a blog, I didn’t know anything about setting one up but somehow, after trial and error, I got one up and running on my own. And I sure didn’t have it easy, like how it is now, to start a blog with a simple 1-click install to have one up and running in no time.
Having a blog sure can be rewarding whether it’s to earn money from, as a hobby or just an outlet to share your thoughts.
In choosing a blogging platform, I would recommend using wordpress. Not only is it free, but it is the most popular open-source content management system, in creating and managing a blog, with it’s ease of use.
WordPress has a large community that contributes regularly in updating the wordpress software and providing thousands of plugins and templates, that you can choose from, to easily manage your blog. My blog uses wordpress and with all the features it provides and ease of use it offers, I wouldn’t use any other platform.
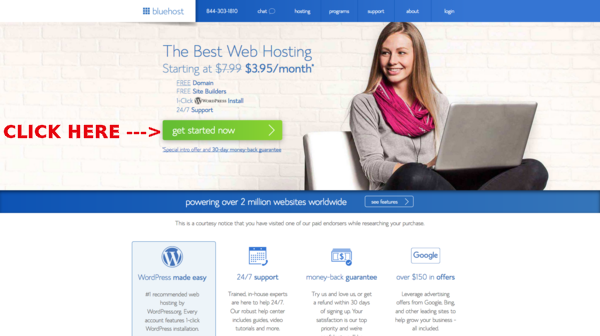
First of all to get your blog live, you need to get it self-hosted through a trusted hosting company. I recommend Bluehost because they have been in the hosting business for over 14 years, providing quality service with great pricing. They are one of the top hosting companies around, with over 2 million sites powered worldwide through their web hosting service. With their hosting package, not only do they make it easy and quick to set up a wordpress blog, they also give you a free domain name for your blog and ssl certificate to make your site secure. Their 24/7 friendly customer service is always available to help you out anytime you need them. Plus they offer a 30-day money back guarantee.
What are you waiting for, let’s get your new blog up and running!
Step 1: Get started now. Click Here and let’s head over to Bluehost. Then come back here to follow the rest of the easy steps in my tutorial.
Step 2: Select your plan. There are 3 plans you can choose from: basic, plus and prime. I would recommend, for now, just going with the basic plan as that should be sufficient to get you started. Later on if you wish to upgrade, you can. But do get the hosting for at least 12 months because you don’t want to be worrying about renewing it every month plus you get the free domain name included with a minimum 12 months purchase, that’s $15 savings right there. And the hosting gets cheaper the longer the term, eg. $5.95/month for 12 months, $4.95/month for 24 months and $3.95/month for 36 months. To get this discounted pricing (plus the free domain name), you need to go through my link here as bluehost has given me a special price for referrals from my blog.
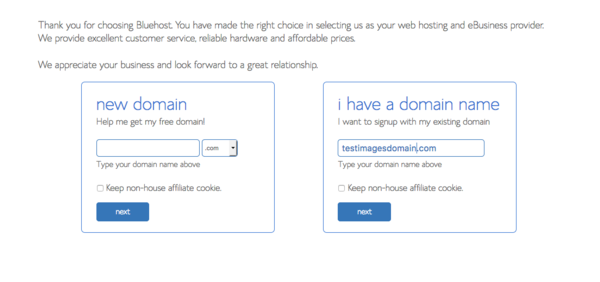
 Step 3: Choose your domain name. If you don’t already have a domain, and even you if do, choose one since it’s free. I would choose a .com before any other extension, just because .com rules and has been the prominent one since the internet began. In case the name you want isn’t available, then choose a .net, .org or another extension, if you really want that name. Sometimes just adding a prefix or suffix to the name can get you the .com, if isn’t available. Do consider that option because, as I said earlier, .com rules and you are taken more seriously when your site is on one.
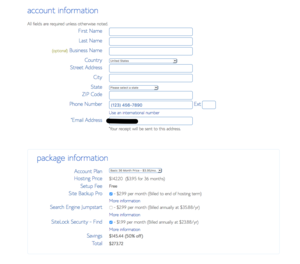
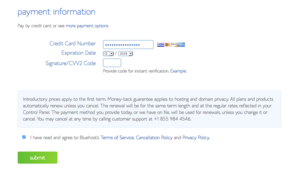
 Step 4: Account, package and payment information. Here you fill out simple information about yourself and contains your package info pricing plus anything additional you want to add on. Make sure you add domain privacy, for you domain name, as protects your private information from publicly being displayed. A lot of spammers try to get info that way to contact you so best to make it a private registration. Then the next screen is where you make your payment, either by debit or credit card. Once you submit and is processed, you will come to a screen where it asks you to create a password for your account.
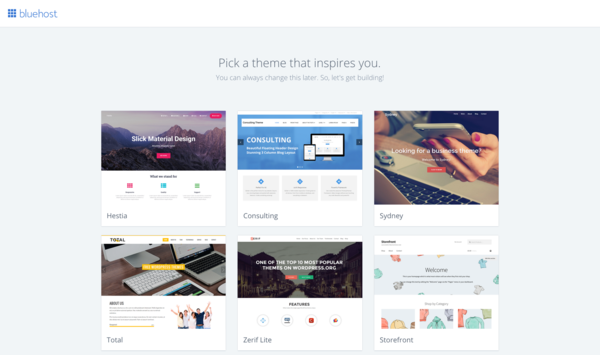
Step 5: Pick a wordpress theme. Once the initial set up for your hosting account is done, you can now pick a theme for your wordpress blog. There’s lots of wordpress themes to choose from and, if you are undecided, just select any one to get your blog up and running. After you can always change your theme, if not satisfied with the one you selected.
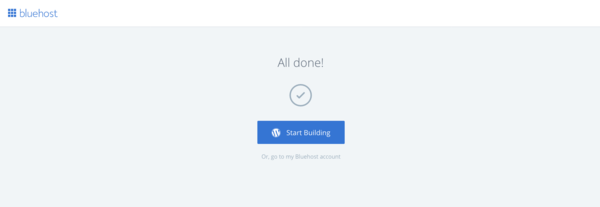
Step 6: Start building your site. Already? Yes, now that you picked your theme, just like that you can click to start building your wordpress site.
Step 7: Welcome to wordpress. You have now entered the wordpress interface. Just click business or personal, as to which type of site you want to create, and soon you will be going live.

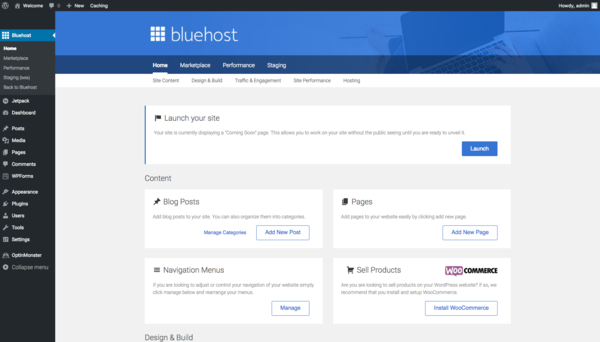
Step 8: Launch your site. Here you can add blog posts, pages, navigation menus and even setting up products to sell. But let’s click launch so you can see how easy it was to get a wordpress blog up and running in a matter of minutes. Later you can always put your site in maintenance mode by adding a “coming soon” page, using a wordpress plugin, while you tweak it up to the way you like it.
Step 9: Ready to go live. Now all you have to do is select the title of your site, which usually is your domain name but you can name it whatever you like that most represents your site. Then give a brief description so visitors know what your site is about. Click and your site is ready to go live.

Step 10: Congratulations your site is LIVE! It’s time to celebrate a job well done with Sweet’s Ballroom Blitz!
If you have any questions, feel free to contact me and do share your thoughts in the comments section below.
Happy blogging!
If you found this article helpful, PIN IT ON PINTEREST!

____
*Please note there may be affiliate links in this post and to read my disclosure policy for more info.
11/365